DHCP configuration
– optional –
DHCP options can only be applied to eLux devices.
A new device booting for the first time can retrieve the following information from a DHCP server:
- IP address or name of the Scout Server (option 222)
- List of Scout Servers (option 224)
- ID of the destination OU on the Scout Server (option 223)
This requires configuring the DHCP server via one of the two following methods.
In method 1 (recommended), you define a new vendor class, set the new options, and then apply the values. Method 2 uses the DHCP Standard Options 222, 223 and 224.
The following instructions are based on the DHCP manager of Windows Server 2012.
Method 1: Defining user-defined vendor class
|
|
Requires DHCP server compliant with RFC 2132, supporting user-defined vendor classes. Otherwise use method 2. |

-
Open the DHCP manager.
-
Select the relevant DHCP server, and then click Action > Define...
-
Click Add... to create a new class:
Option Value Display name eLux NG Description eLux specific options Code
(in ASCII column)ELUXNG The entry is automatically extended with the related hexadecimal number (45 4C 55 58 4E 47).
-
Click Action > Set Predefined Options.... Then, in the Option class list field, select eLux NG.
-
To define one Scout Server, click Add... and edit the new option as follows:
Option Value Name Scout Server Data type String Code 222 Description Name or IP address of the Scout Server -
To define more than one Scout Server, click Add... and edit the new option as follows:
Option Value Name Scout Server list Data type String Code 224 Description Server names/IP addresses, comma-separated -
To define a specific OU that you can assign new devices to, click Add... and edit the new option as follows:
Option Value Name Scout OU ID Data type Long Code 223 Description ID of the destination OU -
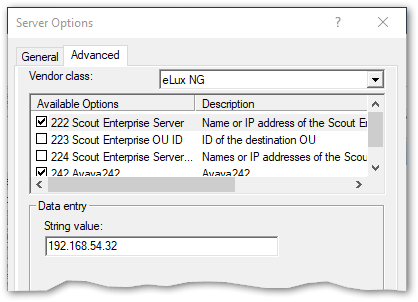
To assign the options, for the relevant DHCP server, select either the Server Options, the Scope options or the Reservations. Then click Action > Configure Options... > Advanced.
In the Vendor class list field, select elux NG. Select each option defined and enter its value into the Data entry field:
Option Value 222 Scout Server <Name or IP address of the Scout Server> 223 Scout OU ID <ID of the destination OU> 224 Scout Server list <Names or IP addresses of the Scout Servers, separated by comma> 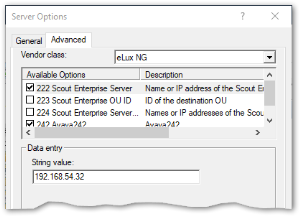
Method 2: Using DHCP Standard Options
|
|
Requires The DHCP Standard Options 222, 223 and 224 must be available. Otherwise use Method 1. |
-
Open the DHCP manager.
-
Select the relevant DHCP server, and then click Action > Set Predefined Options.... In the Option class list field, select DHCP Standard Options.
-
Click Add... to create the following Standard Options, as described for Method 1:
- Scout Server, String, 222
- Scout Ernteprise server list, String, 224
- Scout OU ID, Long, 223
-
To assign the options, for the relevant DHCP server, select either the Server Options, the Scope options or the Reservations. Then click Action > Configure Options... > General.
Select each option defined and enter its value into the Data entry field:
Option Value 222 Scout Server <Name or IP address of the Scout Server> 223 Scout OU ID <ID of the destination OU> 224 Scout Server list <Names or IP addresses of the Scout Servers, separated by comma>
Disabling DHCP option 12 as source for host names
If you have configured DHCP option 12 (host name), when connecting new devices, you can have the host names set via DHCP. To obtain the host name not via DHCP but from another source, such as the name template defined in the Scout Console, prevent the take-over from DHCP option 12. To do so, use a terminal.ini parameter:
| File | /setup/terminal.ini | |
| Section | Network | |
| Entry | IgnoreDHCPHostname | |
| Value | true | The default value is false. |

