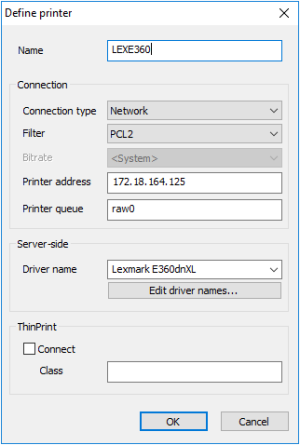
Defining a network printer
-
In the device configuration, on the Printer tab, click New.
-
In the Define printer dialog, type a name for the network printer.
-
In the Connection type list, select Network.
-
In the Filter list, select one of the following options:
Option Description None The printing data from the session are forwarded to the printer in an unfiltered format. Text Enables printing from a local shell PCL2 Enables printing to non-postscript printers in PCL format If the users do not print from a Citrix session, the connected printer must support one of the following languages: PCL2, PS(Postscript) or PDF.
-
In the Printer address field, enter the IP address of the server.
-
In the Printer queue field, enter the share name of the printer.
-
In the Driver name field, enter the printer's driver name. The driver is used for printing from a Windows session.
Make sure that the printer driver name is spelled in the same way as the name of the installed driver on the server. The name is case-sensitive and sensitive to white spaces. If the names do not match, the server cannot identify the driver.
For further information, see Citrix auto-created printers.
- Confirm with OK and Apply.
For further information, see your printer's manual.


