Defining a VPN profile
– from Scout 15 2101 –
To create VPN network profiles in earlier versions, use the Advanced device configuration for individual devices. For further information, see VPN.
You can define one or more VPN profiles for entire OUs.
-
In the Scout Console, for the relevant OU, open Device configuration > Network.
-
On the VPN tab, click Add.
-
In the Edit network profile dialog, edit the following options:
Option Description Profile name Name for the new VPN profile Connect automatically The VPN client starts automatically and sets up a connection. VPN client type Choose between the following options: OpenVPN
CiscoAnyconnect
Use this option also for the Cisco Secure Client1 – both Cisco VPN clients can be used to connect to an AnyConnect VPN.
User-defined VPN client
Specify the ID number of your VPN client.
Configuration
(only OpenVPN)Name of the OpenVPN configuration file without file name extension The specified configuration file must be available on the devices.
-
Confirm with OK.
Note that the eLux devices need to have the VPN software packages and the relevant certificate. A configuration file may be added. For further information on creating OpenVPN and Cisco AnyConnect profiles, see also VPN.
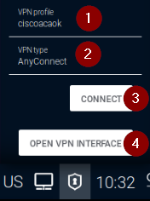
Once users have an active VPN connection, they can use the live information icon on their system bar:
|
|

