Installing ELIAS 18 / Windows
Before you start to install, make sure you have read the topics System requirements and Preparing for installation.
-
Run the EliasInstaller.exe file as administrator.
-
Select the installation language. Subsequently, read and accept the license terms.
-
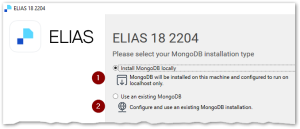
Select whether to install MongoDB locally or to use an existing MongoDB installation.

1 The database will only be available on the local host. 2 To use an existing MongoDB installation, in the next step, specify the MongoDB connection data. For an existing MongoDB installation, note the following:
-
If you want your administrators to access the same MongoDB installation from multiple web servers, use different databases within the MongoDB installation.
-
Specify the MongoDB server address with its port number, and the user credentials. Depending on the configuration of your MongoDB installation, specify additional options, for example, to connect to a specific replica set with timeout. MongoDB creates a URL connection string from the information provided. For further information, see https://docs.mongodb.com/manual/reference/connection-string/
From ELIAS 18 2104, all containers are stored in one database. This allows administrators to create additional containers later on, independent of the database user. The database prefix is no longer required.
-
-
In the next step, enter a name for your ELIAS database.
-
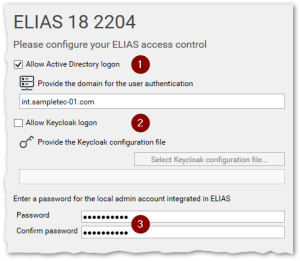
Then specify your ELIAS access control:

1 AD domain for Active Directory user authentication Example: int.sampletec-01.com
Domain users need to be registered in a specific AD group. For further information, see Access management via AD in the ELIAS 18 guide.
2 Configuration file of the Keycloak server for Keycloak authentication1 Example: C:\install\ELIAS\keycloak.json
For further information, see Access management via Keycloak in the ELIAS 18 guide.
3 Password for the local admin account Note that the Domain and Password fields relate to two different logon types. For further information, see Access management and logon in the ELIAS 18 guide.
-
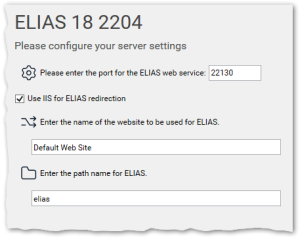
Configure your web server settings:
If there is no IIS on your system, the ELIAS web service is installed on port 80 unless you specify another port number.
If an IIS already exists on the system, select the option Use IIS for ELIAS redirection. In this case, ELIAS is installed on port 22130 to avoid a conflict with web server port 80. To make ELIAS accessible via the default ports 80/443, it is registered using the reverse proxy procedure and the specified sub-directory.
Specify the web site name and a path name for ELIAS.To use HTTPS, an external web server such as IIS is required. The web site must be bound to port 443.
To configure your devices for updates, specify the path name defined here on the Firmware tab of the device configuration in the Scout Console
-
Confirm or change the installation path.
-
To start the installation, click Install.
After the installation is completed, you will find an ELIAS desktop icon containing the URL of your ELIAS 18 installation. Double-click it to open ELIAS in the default browser.
Cross-origin requests
After installation, cross-origin resource sharing (CORS) is allowed only from the installation server network (FQDN) for security reasons. This server is set by the installation routine under allowedOrigins. Administrators outside this network cannot access the installation.
-
To allow access from other networks, add additional servers with their FQDN in the config.json file under allowedOrigins. Optionally add a port number after the server name with a colon. Separate multiple entries by comma.
Using the wildcard character, you can also configure global access. However, we do not recommend this for security reasons. Example: "allowedOrigins": ["*"]


