Upgrading to later versions
We recommend that you make a backup before you upgrade.
Via installation file
– for Debian and .ova installations –
This procedure works for upgrades from SCG 1 2201 to SCG 1 2209 and for later versions.
-
From our myelux.com portal, under Downloads > Scout Cloud Gateway, download the current SCG Debian package scg_<version>_amd64.deb.
-
Copy the file to your SCG instance and connect to it via SSH.
-
Enter the following command:
dpkg -i scg_<Version>_amd64.deb
During installation, the package manager checks for configuration changes. This is the case for the NGINX web server configuration. Apply the maintainer version and add any custom changes manually.
-
Only Debian: Check the web server configuration and restart the web server. For further information, see Installing the Debian package and configuring the web server.
-
If you have multiple instances, update all instances one by one using the above procedure.
-
Connect to an instance via WebAdmin interface and check whether the gateway configuration has been correctly applied.
-
Also, reset the browser cache to update outdated data. For example, use the key combination CTRL+F5 (Firefox).
Via cluster process
– for .ova installations < SCG 1 2201 –
Initial situation: You have an existing Scout Cloud Gateway installation with minimum one instance in use. The registered devices are connected to the SCG server via a DNS entry. When updating to a later SCG version, you want the devices to remain on-boarded and configured as they were before.
To upgrade the version of an SCG installation (A) to a later version (B), create a new instance with version B and then transfer the configuration from A to B using the cluster function. To do so, perform the following steps.
-
Install an additional virtual machine (.ova) with the new Scout Cloud Gateway version B, see Installing the VM.
-
On the machine, configure the hostname and networks, see Setting first configuration settings on VM.
-
Log on to the WebAdmin interface of the new instance B via a browser, see Connecting and logging on to the SCG instance.
Please do not perform any configuration of instance B. The configuration is automatically applied through the synchronization of the cluster. Instance-specific configuration is done after clustering.
Browse to Configuration > Cluster.
-
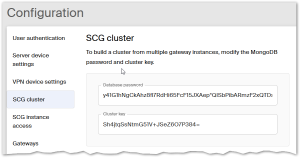
At the same time, log on to the WebAdmin interface of instance A and open Configuration > Cluster. Copy the following values from instance A and paste them into the configuration of instance B:
Database password
Cluster keyThese two values ensure that instance B is added to the existing "cluster" and thus receives the configuration of instance A. Instance B connects to the existing MongoDB database.
-
Save the configuration of instance B and give it at least 10 minutes.
Do not refresh the browser view of instance B and keep both VMs powered on.
After the system has saved the new configuration, both instances are visible in the Gateways view of both WebAdmin interface. Instance B has applied the configuration of instance A except for the gateway configuration.
-
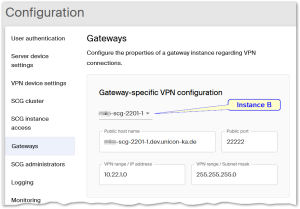
Configure the gateway settings for instance B. To do so, select instance B from the list box under Configuration > Gateways and configure the VPN connections. For further information, see Gateways.
Both gateway instances are now shown with their properties in the Gateways view.
-
In the Gateways view, deactivate instance A, see Gateways view.
-
Shut down the virtual machine A.
-
Set your DNS entry to the IP/host name of instance B.
-
Verify whether instance B allows for the client connections. To do so, you may use the following options:
-
The Gateways view must show the public host name and port of instance B.
-
In the WebAdmin interface of instance B, perform a health check. All components must be up and running.
-
On-board a new device or restart a connected device. The device must be assigned to gateway B (Gateways view).
-
-
In the Gateways view, delete instance A.
Instance B has now adopted the entire configuration of instance A, including the devices. As soon as a device restarts, it connects to the new instance B.
Also use this procedure if you want to change the host name of a gateway instance (without updating to a later version).


